Every time I think of putting away my beads, I always end up starting a new necklace. I finished a smaller version of "Pearly Shell" the other day, and am now wondering when will I wear it. The pendant size is just about 1/3 of the big one, but the materials used on both versions are almost the same.

Pearly Shell Necklace - Smaller Version

Pearly Shell - The 2 Versions
And for the first time, I managed to finish a choker using Mill Hill seed beads and fire-polished stones. I'm not that enthusiastic about chokers but this simple design has been lingering on my brain, so might as well BEAD IT! I might make a different color combo with matching earrings... but we'll see...

Loopy-loop Choker
I tried to take a better shot of the back of encrusted beading pendants prior to connecting the front and back, but my camera failed to produce sharper photos again. At any rate, here's what the back looks like! Another tip I forgot to mention on my previous post is that, always put some marking on the stabilizer to avoid confusion later on. Refer to the "x" marks on each piece.

Back of Encrusted Beading Pendant
If the weather forecast is correct, we'll gonna have more snow early next week so I decided to return the borrowed books at the library as they will be due on Tuesday. You don't expect me to go home empty handed, right? I got me another bunch of wonderful needlework book assortments, i.e. a couple of beading books, a couple of embroidery books, a quilting book (Iowa Quilts), and a book about fabric dyeing and painting. Oh and yes, I had to browse them right away earlier... and I'm sure I'll gonna spend more time with the beading books.

Various Needlework Books from Library
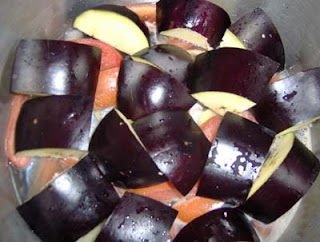
We managed to get some groceries and had a lunch out. Not to mention we did able to dropped-by at the Filipino store and got myself another batch of fishes (milkfish and GG, as in galunggong... LOL), some Philippines condiments, and a Bibingka Mix to broil (Rice Cake Mix). Needless to say, I can't let those GG to take more rest on our freezer... LOL I'm currently cooking them while typing this post. Again, this talk about Filipino dishes is more for my relatives who read my blog. LOL This dish is a combo of paksiw and pinangat! My best tip for cooking GG is to set the stove really low... Do not rush them! As the saying goes, slowly but surely! The photo below was taken before I put the pan on the stove. Here's how I arranged the ingredients on the pan: a medium size chopped onion at the bottom, GG, a little bit of fresh cut & crushed ginger, 1/2 tsp of salt, 2 pieces of daredevil peppers, a teaspoonful of peppercorns, 2 tomatoes (sliced & seeded), sliced eggplants, a cup of Datu Puti vinegar and 1/3 cup of tap-water. When they're almost done, sprinkle some oil. This goes very well with either plain or fried rice. I can see myself eating this dish in the next couple of days... and more garlic fried rice tomorrow!

Paksiw or Pinangat na GG
And speaking of fried rice, I had so much fun spending time with my NNC family last week and one of our recent topic was Philippine's garlic fried rice! I had to make some the following day with baked turkey leg as companion. I, of course, had to prepare sugarcane vinegar with salt & pepper as sauce. So yummy!

Garlic Fried Rice & Baked Turkey Leg
That's all for now folks! I hope everyody's having a great stitching week!


2 comments:
Drooling over the garlic fried rice! lol!
Good job!
Happy blogoversary!
Post a Comment