WELCOME


ABOUT TCN & LODY'S CREATIONS ONLINE SHOP

Timber Creek Needleworks is a newly opened counted thread company owned by a husband and wife team. Launched on August 2008, TCN specializes in traditional and new techniques 3-dimensional hand-finishings.
Lody's Creations now carry some stocks for your stitching and finishing needs. Watch out for more items in the near future as we offer a group discount. Also, we can easily get inventories from Yarn Tree, a cross stitch distributor from Iowa, so please browse Yarn Tree's website and let us know if you want us to do a special order for you. Please take note that they only sell to shop owners and you can not place an order directly to them.
Showing posts with label Finishing Tutorials. Show all posts

Monday, January 19, 2009

Basic Info on Finishing An Encrusted Pendant

A special post for Janet.:) She asked me how I finish the back of my necklaces so I thought I'd better post my response here.

First of, I stabilized both my front and backing fabrics. Timtex or buckram works best but since I don't have both, I used skirtex instead. Prior to encrusting the front piece, I make sure that both front and backing fabrics are of the same size so they would fit perfectly later on. Please refer to the first photo.
Encrusted Front Piece and Backing Fabric
Once all the stitching is complete, I slipstitch or blindstitch the 2 pieces then finish off the entire edging with moss or lazy stitch. Moss stitch was use for this model piece. Here's what it looks like at the back once all the stitching is completed.
Back of a completed pendant

MORE TIPS:
1. Do not put any finishing stitches on the edge until front and back are connected as the main reason for embellishing the edge is to hide the connection.
2. Always remember to secure the last stitch then bury the tail of thread inside the pendant for a clean finish look.
3. If you are daring enough, a fringe finish at the bottom part would always be fabulous!
Any queries about this topic? Drop me a line or 2 and I'll try to answer them for you.

Sunday, May 4, 2008

Bounded Needlebook Finishing Instructions


Here's the second sewing accessories I finished for Lynne's blackworks on March. The bounded needlebook was publish this month (May 2008 issue) at The Gift of Stitching magazine. Once again, I made my own version as I didn't took step-by-step photos during the finishing stage of her design. Lynne's design is square, while mine is rectangular. Please notice the difference of the finished products. Below is the step-by-step instructions with a bunch of pictures for your reference.

Materials and Tools Needed:
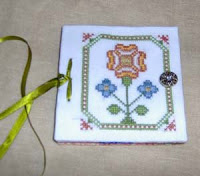
  1. Stitched piece
  2. Backing fabric - 3 pieces of 6" x 6" cotton
  3. Felt pages - at least 3, the more the better
  4. Acid free matboard - 4 pieces
  5. Tacky spray glue (crystal clear)
  6. All purpose Tacky glue (optional)
  7. Coordinating ribbon (24" to 30") and button (1 pc) - for closure
  8. Scissors and ruler
  9. Big eyed needle - for binding
  10. Sewing needles and coordinating thread
  11. Binder clips (optional)
  12. Beads and charms (optional)
  13. Paper towels or old newspapers
  14. Pins

Finishing Instruction:
1. Iron stitched piece & backing fabric if necessary. At this stage, determine the size of your finish piece by making sure that all three sides (top, right & bottom) has or will have the same allowance (say 0.5"), while the 4th side (left) should have an extra 0.5" (total allowance at this side will be 1").
2. Sew button at the center right side of the stitched piece.

3. Measure and cut 4 pieces of 4” x 4” acid free mat board. I love signing my mat board with a wish for GOODLUCK. For this piece, I signed "GOOD WILL TO MANKIND".

4. Lay your acid-free matboards on the paper towels or old newspapers. Following manufacturer's directions, spray glue one side of all acid-free matboards. Let the glue dry a little bit before attaching the backing fabrics and stitched piece. Please make sure that the fabrics are layed flat and placed properly, specially the stitched piece. Remember that the right side of the stitched piece should have more allowance (for binding works) than the other 3 sides. This is what I consider the critical part.

5. Once you're sure the stitched piece and backing fabric were properly placed, spray glue at the edges of the matboards and fabrics. Let the glue dry a little bit then miter corners and carefully fold-in the edges, making sure they'll be smooth. This step is the messiest part as your fingers will surely get a little sticky. However, I prefer to use spray glue on step 4 and 5 for smoother finsihing. If spray glue is not available, you can just use all-pupose glue but be sure that the application is even to avoid bubbles and rough surface.

6. Having your pieces still on the paper towel or old newspapers, spray glue generously on the middle parts of the acid-free matboards and just a little bit on the fabric edges. Let the glue dry a little bit before attaching the stitched piece to one of the backing piece (wrong sides facing each other), same as with the other 2 backing pieces. Once attached, put binder clips at the corners to flatten those areas.

7. Measure and cut felt pages slightly smaller than the matboards to avoid them from sticking out. The more pages you put, the better.

8. Sandwich the felt pages in between the front (stitched piece) and back cover of the needlebook then secure top and bottom with binder clips before marking with pins the left side at least 3 points for binding works. In this case, I marked the center point first, then I count out 0.75" on both sides... having 3 points marked.

9. Thread your ribbon at the big eyed needle. Start binding at the point "A" (top to bottom), then point "B" (bottom to top), then point "A" again (top to bottom), then point "C" (bottom to top). At this point, remove the big eyed needle then tie or knot the ribbons (tail and the threaded) at the center (or point A) at the front part. Do the same at back part. Please see notes and tips below.

10. Attach beads and other embellishments for extra fling at the tips of the ribbons. I strongly recommend to use beads with bigger holes so you can easily insert the ribbon.

11. Using a ruler, place it along the binded part (left side along point A, B & C) then lift the cover to form a folded line. This will be your guide to easily open your needlebook. If you won't do this part, your cover will be stiff.

12. Congratulations!... the needlebook is now ready for your all kinds of needles.

Notes and Tips: In reference to the above photos, this needlebook can close in 2 ways - loop and bow methods. If you will use 30" ribbon, there should be enough tie and tail at the back of point "A". Leave a tail of 6" to 8" at starting point (top of point "A"). You can loop the long ribbon at the button then bring it back at point "A" to make a bow with the tail. On the other hand, you can just use 24" ribbon and close it using loop method. I used the latter for Lynne's blackwork.

Hope to see your finished piece soon. Should you have queries about this finishing, drop me a line or 2 and I would be glad to clarify it for you. I was kinda sleepy while writing this finishing so I may have missed some tips. At the back of my mind, I know I did but I just couldn't figure it out at the moment... lol

Thanks for dropping by and have a great evening everybody!

Saturday, April 5, 2008

Sewing Necessaire or Mounted Ornament Finishing Instruction

Lynne's Blackwork Design - TGOSM April '08
Here's the first in the four sewing accessories I finished for Lynne last month. All will be featured at TGOSM, and this one was already published at April 2008 issue. I was such in a hurry to finish them that I didn't able to take photos of the step-by-step finishing instructions. I told Kirsten I'll post a pictorial instruction here at my blog after each publish/release, so here it is.
Please be advise that the finishing below is applicable to mounted ornaments and neck pockets as well.
My Pocket Ornament Complimentary Model

SEWING NECESSAIRE / MOUNTED ORNAMENT / NECK POCKET

Materials & Tools Needed:
1. stitched piece - maximum 4” x 4”
2. backing material - at least 6” x 12”
3. thick batting or wadding - 4.5” x 8.5”
4. acid free mat board - at least 4” x 8”
5. wool felt - 3” x 4”
6. coordinating thread - for slipstitching
7. needles (1 for hand-sewing & 1 with big eye for a 5 mm ribbon)
8. scissors, tacky glue, pins, ruler & pen
9. embellishments: 6”-5mm (or thicker) ribbon, 6”-decorative trimmings (for pocket lip), at least 22”-fused beads (for decorative edge), and 1 pc-coordinating button (optional)
Note: If fused beads is not available, replace it with twisted cording...


Finishing Instruction:
1. Iron stitched piece & backing fabric if necessary.
2. Measure and cut 2 pieces of 4” x 4” acid free mat board. I love signing (most of the time) my mat board with a wish for GOODLUCK. For this piece, I signed "WORLD PEACE".

3. Apply glue on one side of both 4” x 4“ mat boards then stick/attach them to the wadding. Trim wadding to the same size as mat boards.

4. Lay the backing fabric with good side up. Measure 7” then fold, good sides facing each other. From the folded part, measure 3” then fold it down. This will serve as the pocket later on. You should now have a 6” x 6” backing fabric. Pin the sides if necessary. (Note: for finishing a mounted ornament, omit step 4, 5 & 10, just simply cut a 6" square backing fabric then proceed to step 6 to 9.)

5. Slipstitch the decorative trimming at the lip of the pocket.

6. With your stitched piece facing down, put the padded mat board on top of it and make sure it is centered. Apply glue at the edges of unpadded mat board then stretch and attach the stitched piece onto it. While the glue is still wet, check again if the stitched piece is centered. Make sure it’s on the right place at this point. Do the same procedure with the backing fabric.

7. Slipstitch or blindstitch the stitched piece and backing.

8. Using headpins, mark one edge with 0.5” intervals... one side at a time as you go along attaching the fused beads. You can start at either top-right or top-left clockwise. For a scalloped effect, count out 4 beads then slipstitch at 0.5” interval.

9. The hanger of model piece has a 4” drop-down length as I finished it into a pocket ornament. If you want to use it as a neck-pocket, simply increase the hanger drop-down length to 18” or to your desired length. Or if you just want to put it in your sewing basket, no hanger is necessary. That's how I finished Lynne's blackwork.

10. Fold wool felt cross-wise (size will become 2” x 3”) giving you a couple needle pages, then place spine underneath the decorative trim. Attach it using the button & ribbon. Either button or ribbon alone will work as well. Note: This step can be done after step 5, but I always prefer to do it last to make sure attachments are all centered.

11. Your sewing necessaire is now waiting to be filled with your stitching knick-knacks.
I've made a bunch of neck pockets in the past using the above technique. Example of which are the quaker hearts from TGOSM. Check out my online gallery to see a finished product.
Should you have any queries with regards to the above finishing, drop me a line or 2 and I will do my best to clarify it for you. Hope to see your finished piece soon using the above finishing!
IMPORTANT: My finishing instructions are copyrighted, so please do not post them elsewhere. Thank you so much!