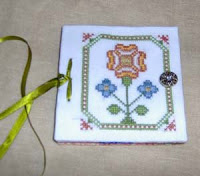
Here's the second sewing accessories I finished for Lynne's blackworks on March. The bounded needlebook was publish this month (May 2008 issue) at The Gift of Stitching magazine. Once again, I made my own version as I didn't took step-by-step photos during the finishing stage of her design. Lynne's design is square, while mine is rectangular. Please notice the difference of the finished products. Below is the step-by-step instructions with a bunch of pictures for your reference.
Materials and Tools Needed:
- Stitched piece
- Backing fabric - 3 pieces of 6" x 6" cotton
- Felt pages - at least 3, the more the better
- Acid free matboard - 4 pieces
- Tacky spray glue (crystal clear)
- All purpose Tacky glue (optional)
- Coordinating ribbon (24" to 30") and button (1 pc) - for closure
- Scissors and ruler
- Big eyed needle - for binding
- Sewing needles and coordinating thread
- Binder clips (optional)
- Beads and charms (optional)
- Paper towels or old newspapers
- Pins
Finishing Instruction:
1. Iron stitched piece & backing fabric if necessary. At this stage, determine the size of your finish piece by making sure that all three sides (top, right & bottom) has or will have the same allowance (say 0.5"), while the 4th side (left) should have an extra 0.5" (total allowance at this side will be 1").
2. Sew button at the center right side of the stitched piece.
3. Measure and cut 4 pieces of 4” x 4” acid free mat board. I love signing my mat board with a wish for GOODLUCK. For this piece, I signed "GOOD WILL TO MANKIND".
4. Lay your acid-free matboards on the paper towels or old newspapers. Following manufacturer's directions, spray glue one side of all acid-free matboards. Let the glue dry a little bit before attaching the backing fabrics and stitched piece. Please make sure that the fabrics are layed flat and placed properly, specially the stitched piece. Remember that the right side of the stitched piece should have more allowance (for binding works) than the other 3 sides. This is what I consider the critical part.

5. Once you're sure the stitched piece and backing fabric were properly placed, spray glue at the edges of the matboards and fabrics. Let the glue dry a little bit then miter corners and carefully fold-in the edges, making sure they'll be smooth. This step is the messiest part as your fingers will surely get a little sticky. However, I prefer to use spray glue on step 4 and 5 for smoother finsihing. If spray glue is not available, you can just use all-pupose glue but be sure that the application is even to avoid bubbles and rough surface.

6. Having your pieces still on the paper towel or old newspapers, spray glue generously on the middle parts of the acid-free matboards and just a little bit on the fabric edges. Let the glue dry a little bit before attaching the stitched piece to one of the backing piece (wrong sides facing each other), same as with the other 2 backing pieces. Once attached, put binder clips at the corners to flatten those areas.


7. Measure and cut felt pages slightly smaller than the matboards to avoid them from sticking out. The more pages you put, the better.
8. Sandwich the felt pages in between the front (stitched piece) and back cover of the needlebook then secure top and bottom with binder clips before marking with pins the left side at least 3 points for binding works. In this case, I marked the center point first, then I count out 0.75" on both sides... having 3 points marked.

9. Thread your ribbon at the big eyed needle. Start binding at the point "A" (top to bottom), then point "B" (bottom to top), then point "A" again (top to bottom), then point "C" (bottom to top). At this point, remove the big eyed needle then tie or knot the ribbons (tail and the threaded) at the center (or point A) at the front part. Do the same at back part. Please see notes and tips below.

10. Attach beads and other embellishments for extra fling at the tips of the ribbons. I strongly recommend to use beads with bigger holes so you can easily insert the ribbon.
11. Using a ruler, place it along the binded part (left side along point A, B & C) then lift the cover to form a folded line. This will be your guide to easily open your needlebook. If you won't do this part, your cover will be stiff.
12. Congratulations!... the needlebook is now ready for your all kinds of needles.
Notes and Tips: In reference to the above photos, this needlebook can close in 2 ways - loop and bow methods. If you will use 30" ribbon, there should be enough tie and tail at the back of point "A". Leave a tail of 6" to 8" at starting point (top of point "A"). You can loop the long ribbon at the button then bring it back at point "A" to make a bow with the tail. On the other hand, you can just use 24" ribbon and close it using loop method. I used the latter for Lynne's blackwork.
Hope to see your finished piece soon. Should you have queries about this finishing, drop me a line or 2 and I would be glad to clarify it for you. I was kinda sleepy while writing this finishing so I may have missed some tips. At the back of my mind, I know I did but I just couldn't figure it out at the moment... lol
Thanks for dropping by and have a great evening everybody!


4 comments:
Thanks Lody for your fabulous tutorial!
Great tutorial, thank you!
Perfect backing fabric for the design.
Thanks Lody for all of your hard work. You make my designs beautiful and functional. : )
Post a Comment